When we heard we were going to be Grandparents again, after a gap of 17 years I decided this time I'd make a baby blanket. Then I had a brain storm. I would make it a family tree blanket, where baby could lift each leaf and see the photo of a family member. I did toy with the idea of putting a nut or two on the branches for certain family members, or tree animals, like a possum in a knot hole etc.
I made it up as I went, and most likely broke all the quilting rules along the way, but here is my journey. It took me 5 months over all, as I designed it, thought and slept on how to do what I wanted to, jabbing my fingers a hundred times along the way.
My plan was to create maple leaves for the Canadian side of the family, and pick an appropriate Australian and British leaf types, for the Australian and British sides. I found lots of leaf outlines on the net, and selected my Maple Leaf pattern, but the British trees were much the same as Canadian, and Gum leaves weren't wide enough, so in the end, I decided to make all the leaves Maple.
First I bought the blanket front material. I wanted something earthy so picked a Calico, and saw some newly arrived batik material bundles, perfect for leaves, so bought a bundle in oranges and greens. A strip of Brown for the Trunk, then started making the leaves.
There are a lot of points in Maple Leaves, what was I thinking? However, I cut out a front, back and batting for the middle and set to work stitching them, turning them inside out, then stitching veins along them.
I drew a picture (very roughly) of how the layout, then using butcher paper cut and taped into the size of my blanket, projected the image onto it (Taped the paper on the window) so the image fit, then drew it onto the paper, so I could cut out the trunk and branches.
I put the pieces (Trunk, branches and leaves) on the table over and over and shuffled them around to see how they looked, placement, colour combo's etc. As the plan was the kids at the bottom moving up the tree to the elders... Graham (my husband) suggested I should use the green leaves for the youngest, then moving up to more gold for the Grandparents. Sensible eh? Then took a photo so I wouldn't forget and pinned a tag of who went with each leaf.
Once I'd received all the photos, I had to decide how best to put them on the blanket. I printed them and cut out them out to make sure they fit under the leaves, and joined leaf here and there where required. Graham did some photoshop work on some of the images and joined Jasmine and Heath for me. I cut them into a love heart shape which I thought was a nice touch.
I cut my tree bits, and the batting to go under to give it depth, then using the cut out pattern to see roughly where I wanted to place it, I laid the leaves on it as well, and shuffled all around until I knew where I wanted them all to go, deciding not to use extra branches, at all. I took a photo so I remembered it, then sewed on the trunk. It looked a bit flat, so I sewed lines and knot holes into it for depth and texture.
I liked the colour of my leaves so much, I decided to make the boarder in the same colours so cut strips and sewed them together to form a long ribbon. I was so keen, I sewed it onto the front. (That was a technical mistake, but there you go, excitement got the better of me.)
I had thought I'd just use T-shirt transfer paper and iron them to the blanket, but after the first attempt when I melted Wyatt, and scrapped him off, I decided to iron them onto a white material, with batting underneath, and sew them on. I bought some wonderful brassy gold thread and zigzagged my way around the edges. Which I thought looked quite good.
I had a few heart stopping moments when Jasmine and Heath (the baby's parents) faces peeled off as I sewed around them. Not just once, but TWICE I had to unpick them, and start again. Graham and I studied the images, and decided it was a user error in the ironing. It was too shiny so was sitting over the material rather than getting
into it.
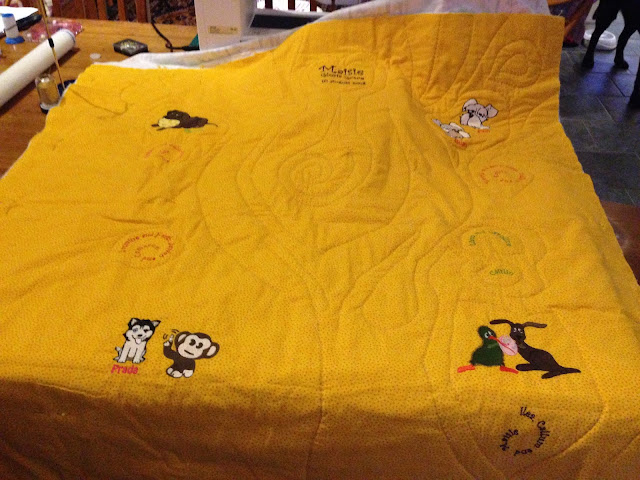
I needed to fill in some space, so sewed some leaves flat using the gold thread to outline them, and scattered around a few sew-on decals which I thought a child might enjoy. Hiding the kangaroo and Echidna under leaves, the others stitching on. I re-stitched the tree using the gold thread too, which gave it more lift.
I printed a stork carrying a baby to put Cameron's photo under, added a big puffy embroidered name, and realised I'd have to quilt it.
Sooooo, I used 2 layers of woollen batting, added a back re stitched the photos and leaves (for blanket stability and added strength for baby pulling on the leaves), and did some free handed quilting.
With leaves up
And the back
I made some strips for hanging with, using material to match the boarders adding them, then turned the edges and sewed them on, and tackled the mitred corners.
Cameron Jack arrived on Friday Sept 18 2015 at 1:52 pm.
 |
| Boompa and Cameron |
I waited eagerly for a photo of him to add on, and just had time to add him, and the information tag I'd forgotten to to make, finishing 1 hour and 40 minutes before we left to fly over and meet him.
In the rush I made a typo in my the signature block, but I think no one minds.
l was so pleased with it, I wish I'd had time to enter it in a show before his arrival, however, this was really about him and not my ego. And it was well received, which made it worth the effort.


